
Humans have been preserving food pretty much since forever. While the process itself could take a great deal of time and energy, the payoff was not starving all winter long. Like a most things in life, it started as a means of survival, a great way to make food last longer and not spoil.
Today food preservation has become a hobby for some and a sustainable and economical way of living for others, and of course the method has changed and varied slightly thanks to modern technology.
Canning as a means of preservation didn’t come along until the 18th century. Before that, humans were using salting, fermenting and drying as a means of food preservation, so canning is actually a pretty recent development in the history of preserving food. You might be surprised to hear that it was Napoleon who was the catalyst for the invention of canning (yes, that Napoleon).
A reward was offered by Napoleon Bonaparte in 1795 to anyone that could invent a reliable food preserving method that his travelling army could use. 15 years later, Nicholas Appert introduced a method that involved heat-processing food in glass jars reinforced with wire and sealing them with wax (Your grandma likely used a similar technique, however, this method is no longer considered safe).
Not much has changed in the way of canning since Napoleon, but the one major difference is that today’s cans are made of 100 per cent recyclable steel.
Until the arrival of our modern grocery stores, canning was pretty common in nearly every household. It was a necessity and a way of life because it protects food from spoiling so you can consume it at a later time. Today it is more of a hobby than a necessity, unless you’re like me and believe the zombie apocalypse is coming and are stocking up for survival purposes, in which case I will see you on the other side.
While you don’t have to be a pro, you do need to have patience and the right equipment to be successful. I personally love making a day and an event out of it. Invite a few friends and have a canning party each having your own specific job in the process and sharing in the vast awesomeness that is canning. Canned foods generally keep for up to a year and make awesome gifts! For great beginner resource on caning and other types of preservations check out the amazing book, Put 'em Up!
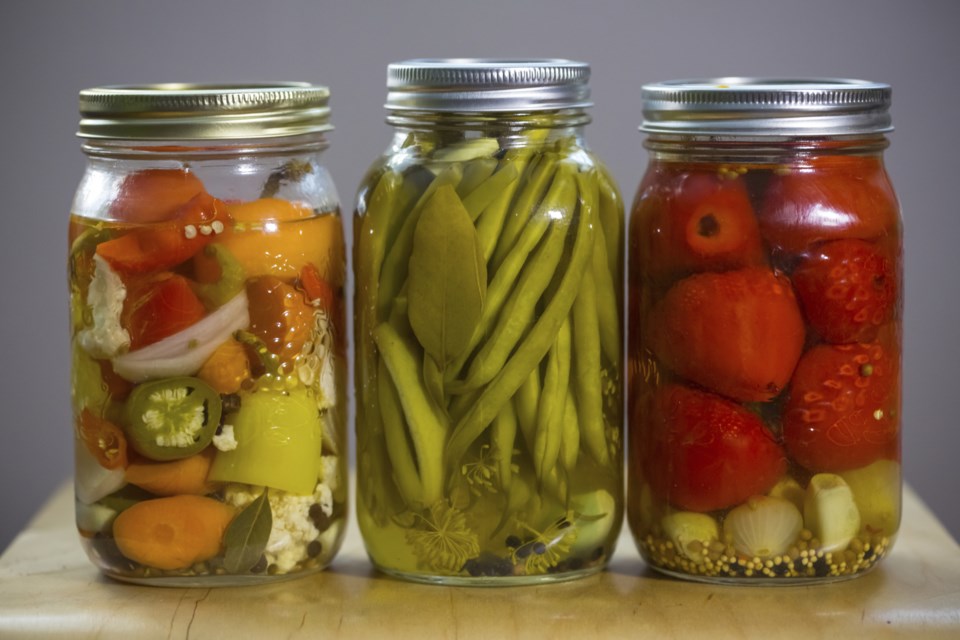
You are able to can almost anything, but there are some different preparation methods required depending on what type or fruit or veggie you are working with, and it generally depends on the recipe you are making. For example, some recipes will ask you to blanch or cook the veggie/fruit, while others while require you to simply just cut, dice or mix the ingredients. And to add to that there are also different canning methods depending on what you are canning.
Boiling water bath versus pressure canning
The correct canning method for the type of food you want to preserve is very important. The reason being: botulism bacteria. Veggies that are not pickled including soups and all animal products can not be safely processed in a boiling water bath, you need a pressure canner in order to process them. Although botulism is killed in boiling water it’s spores can survive that temperature, so hotter than boiling water is required to create an extreme pH level in which the bacteria cannot survive. Because veggies in lightly salted water and animal products have a pretty neutral or alkaline pH, a pressure canner is needed. However, any foods that are acidic – like fruits, veggies, and sugar preserves with a little added lemon juice or vinegar – can be safely preserved using the water boiling method. Sound confusing? It can be! It is best to follow recipes precisely, especially when first starting out.
Nutrition
Although fresh is always better, preserved food is almost the next best thing because canned fruits and veggies retain their nutrients through the canning process.
How to can using the water bath method (perfect for pickles, jams. salsa)
Equipment:
Boiling water bath canner or a large, deep stockpot with a lid, and a rack (when preserving high-acid foods such as soft spreads like jams and jellies, fruit juice, fruits, pickles and salsas)
Glass preserving jars, lids and bands (always start with new lids).
Common kitchen utensils, such as wooden spoon, ladle and funnel.
Fresh produce and other quality ingredients
Clean kitchen cloths
Instructions
Assemble equipment and ingredients needed for the recipe you are making. Follow guidelines for recipe preparation, jar size, preserving method and processing time.
Make sure jars, lids and bands are in good working condition. Jars with nicks, cracks, uneven rims or sharp edges should not be used. The underside of lids should not have scratches or uneven or incomplete sealing compound as this may prevent sealing. Bands should fit on jars. Wash jars, lids and bands in hot, soapy water. Rinse well. Dry bands.
To sterilize jars for canning, fill a large saucepan or stockpot halfway with water. Place jars in water (filling jars with water from the saucepan will prevent flotation). Bring to a simmer over medium heat. Keep jars hot until ready for use. Keeping jars hot prevents them from breaking when hot food is added. In a different smaller pot add lids and bands and use the same method.
Prepare boiling water bath canner by filling half-full with water and keep water at a simmer while covered with lid until jars are filled and placed in canner. Be sure your rack is resting on the rim of the canner or on the bottom, depending on the type of rack you are using. You don’t necessarily need topurchase a boiling water bath canner if you don’t already have one at home. Most kitchens have pots that can double as boiling water bath canners. A boiling water bath canner is simply a large, deep stockpot equipped with a lid and a rack. The pot must be large enough to fully surround and immerse the jars in water by 1 to 2 inches and allow for the water to boil rapidly with the lid on. If you don’t have a rack designed for home preserving, use a cake cooling rack or extra bands tied together to cover the bottom of the pot.
Prepare tested preserving recipe using fresh produce and other quality ingredients.
Remove hot jar from hot water, using a Jar Lifter, emptying water inside jar. Fill one jar at a time with prepared food using a jar funnel, leaving headspace recommended in recipe. Remove air bubbles, if stated in recipe, by sliding the bubble remover and headspace tool or rubber spatula between the jar and food to release trapped air and ensure proper headspace during processing. Repeat around jar two to three times.
Clean Mason jar rim and threads of jar using a clean, damp cloth to remove any food residue. Center lid on jar allowing sealing compound to come in contact with the jar rim. Apply band and adjust until fit is fingertip tight. Place filled jars in canner making sure water covers jars.
Place lid on water bath canner. Bring water to a full rolling boil. Begin processing time (processing time will be included in the recipe you are making). When processing time is complete, turn off the heat and remove the canner lid. Allow jars to stand in canner for five minutes to get acclimated to the outside temperature.
Remove jars from canner and set upright on a towel. Leave jars undisturbed for 12 to 24 hours. Don’t be alarmed if you hear several popping sounds, these are just the jars sealing.
Check jar lids for seals. Lids should not flex up and down when center is pressed. Remove bands. Try to lift lids off with your fingertips. If the lid cannot be lifted off, the lid has a good seal. If a lid does not seal within 24 hours, the product needs to be refrigerated and eaten right away. Label and then store in a cool, dry, dark place up to one year.


